- HubPages»
- Sports and Recreation»
- Hunting & Shooting»
- Guns & Accessories
A Beginner's Intro to Presentation from the Holster (Drawing)

Controlled pairs from the ready and from the holster
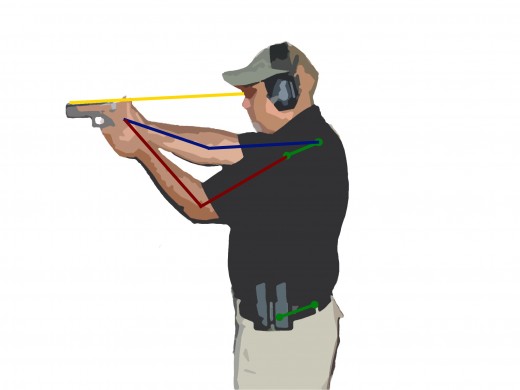

STANCE
I've decided to start this article with a brief description of a proper stance. I've heard some instructors give only general guidelines about what a proper stance is, but it's important for students to have a very specific baseline from which to start. Even if you end up modifying the stance for your body mechanics and style of shooting, you should be aware that there are some basic desirable characteristics of a good stance.
There are two common stances, the Isosceles and the Weaver. Both have strengths and weaknesses. The one I train is the Weaver (actually a modified Weaver, but that doesn't matter). I do so simply because it aligns itself well with the presentation I teach. If you wanted to shoot in an isoceles stance, there would be a slight modification to the presentation technique similar to what I would teach to a person with eye cross-dominance. Each stance has its own characteristics and you should try both, if only to add another tool to the chest. But for now, I'll just deal with the Weaver I teach. This stance wasn't invented by my, it was just taught to me and I think it works very well for this technique of presentation.
Your stance is your foundation and the point of having a good stance is to assist you in reducing the amount of time it takes for a follow-up shot. On the street, your stance will be what it will be given the circumstances at that moment, but if you train a certain way, you're more likely to assume that position under stress and every little bit of advantage will help you in a crisis. I sometimes practice without getting into a proper stance just to see what it feels like and test how it will affect my shooting.
Let's start with the body position. Assuming your target is at 12 o'clock, your body should face about 1 o'clock. If you're left-handed, it'll be about 11 o'clock. So your feet, hips and shoulders should all be facing off the target to one side or the other. Only your head and hands will be pointed at 12 o'clock. This is the position you want to maintain throughout the Presentation sequence.
In this stance, your weight should be even on the balls of your feet, your knees should be slightly bent and you should lean forward slightly from the waist in the direction of your body not toward the target.
Be aware there can be a tendency for some to rotate their upper bodies square to the target at the end of the sequence. This is less than desirable and is wrong for the technique I'm teaching. It's just an extra movement that takes up time and gets your torso out of the weaver stance and into an isosceles position.


Four-count presentation
Now that we have your stance sorted out, let's talk about getting the gun out of the holster. I teach a four-count method. At Front Sight, the curriculum was a five-count. This is the same method taught by the Wisconsin Department of Justice and it's the same method taught by anyone who teaches weaver. You should understand that these counts are a baseline to teach the technique. Once you understand the technique, you can refine it and make it your own. If your shooting starts to suck, go back to the baseline and start again.
What is sometimes lost in translation is the subtle nuances of presentation. For instance, driving down on the gun to achieve a proper firing grip (rather than trying to lift the gun out of the holster) then transitioning to a rapid, smooth deceleration once the hands come together on the gun (as opposed to a sudden, jerky stop) as the sight rise up in alignment in front of your eye (not dropping your head down to the gun). Hopefully, I can get these important fine points across in this article.
COUNT 1-DRIVE DOWN
Count 1 one is a rapid, sudden movement of both hands, your firing hand moves toward the gun to achieve a firing grip and your off-hand (fingers together and thumb up) moves toward your mid-section (somewhere between your belly button and your breast bone). To achieve this, you need to force your body to relax. If you tense up, you won't be able to move as fast or accurately. Forcing your body to relax just takes discipline and training. Shooting really is a martial art.
COUNT 2-LIFT AND ROTATE
Once you've achieve a proper firing grip on the gun (not before) you simply lift the gun straight up out of the holster and rotate it so the sights are level and the gun is tight against your body. Generally, the higher the better, but there is a point where it's too high and the gun starts to come away from the body. This will give you a consistent reference point for where the gun needs to be when it comes out of the holster and BEFORE the gun starts to move forward toward the target. You're support hand is still of the mid-section.
COUNT 3-PUSH FORWARD
You push the gun straight forward rising up toward your eye level. Your support hand slides across the body to meet the firing hand. Important, the support hand slide across, the firing hand move forward and up. Your finger doesn't go onto the trigger until after both hands are on the gun and the sights are coming up on target.
Count 4-PULL REARWARD
Once both hands are on the gun, you begin applying rearward pressure to the front of the stock. This gives you isometric tension to help manage recoil and it also gives you a rapid, smooth deceleration. At an advance level, you can actually begin pressing the trigger before your hands come to the end of their extension. But for beginners, you should extend out taking up the slack on the trigger and begin pressing once you hands are completely extended.
Trigger Control
There are ONLY 3 things that matter when you're firing a handgun defensively, sight alignment, sight picture and trigger control. Of these three, trigger control is the only one that is difficult. It's the one thing we always seek, even as instructors, to master. Here's one technique:
Pressing the trigger starts by placing your trigger finger on the face of the trigger. You want the middle of the pad to go over the face of the trigger. Too much or too little finger in the trigger can cause errors in shooting. For heavier, double-action triggers, you actually want a little more finger in the trigger and can move a little closer to the first bend for mechanical advantage.
Most triggers have some bit of slack or loose play before the trigger begins to get engaged. You want to press through this until you start feeling resistance. This is called taking up the slack. Once you've done this, you simply add pressure until the gun goes off. We know the gun is going to shoot, but we want the actual instant it fires to be a surprise. This will keep you from anticipating the recoil and firing the shot low.
Next, hold the trigger to the rear through recoil. As the sights come back down on target, release the trigger ONLY out to where you hear and feel an audible click. On most guns, that's as far as you have to go the reset the trigger and shoot again.
Some guns may have a little slack on the second press, take the slack out and begin adding pressure again. The gun fires, hold the trigger to the rear through recoil and release out to the reset. Finger off the trigger and come down to the ready. You've just fired a controlled pair, two sight pictures, two shots.
Amazingly, before they started getting trained most of my students knew very little about trigger control. Unfortunately, the average gun owner gets most of their training from action movies. And it's a fact that Hollywood knows nothing about gun handling, except for the minority of actors that have actually had professional training. Congratulations. You can now count yourself in the minority.


")